Showing posts with label dinner. Show all posts

Friday, April 28, 2017

Signature chicken olive and fennel with preserved lemon

The cool change into winter hasn't done any wonders for my health of late. Hit with the flu at the start of the month to the point of being bed ridden for a few days, then a double whammy of mastitis and laryngitis at the end of the month, things can only look up from here, right?

I've only started feeling like myself after finishing a course of antibiotics and been craving some hearty meals. This tagine recipe has been in my repertoire for a few years and too good not to share.

I love that it's a one pot dish with not very much to prep as I always have one of the kids hanging off me. I love to serve this with wholemeal couscous soaking up the delicious sauce. If you end up with any leftovers, I find that this dish tastes better the next day. Don't take my word for it and see for yourself.


Feeds 4 - 6 people

20 mins preparation
60 mins cooking time

Ingredients


10-12 skinless chicken thigh cutlets
1/2 cup (75g) plain flour
1 tsp paprika

100mL olive oil
2 onions finely chopped
4 garlic cloves finely chopped
2 fennel bulbs thinly sliced

400g can cherry tomato
3cups (750mL) chicken stock
1 tbs honey

1 strip of peel from a lemon and zest from 1/2 an orange
1/4 cup (35g) currants
1 cinnamon quill
2 tsp ground cumin
1 tsp ground ginger
16 saffron threads (optional)
1 tsp dried chilli flakes
1-2 green chillies roughly chopped
1/2 cup (60g) green Sicilian olives
1/2 preserved lemon (optional)

Cous cous
200g wholemeal couscous
sprig of mint
1 tbs parsley
1cm of preserved lemon chopped finely

Method

1. Preheat oven to 200 Celcius.

2. Place chicken in a bag with flour and paprika. Season and shake until chicken is well covered.

3. Heat 1 tbs oil in a cast iron over med-high heat and in batches, brown chicken turning for 3 - 4 minutes adding more oil as needed.

4. Transfer browned chicken to a bowl to add later.

5. Reduce heat to medium. Heat 2 tbs oil in cast iron then add onion and cook stirring for 5 minutes or until softened.

6. Add garlic and fennel and cook for 2 minutes to lightly soften.

7. Add tomatoes, preserved lemon, olives, stock, zest, currants, spices, fresh chilli and honey.

8. Place browned chicken on top of vegetables and just submerged in stock. 

9. Bake for 1 hour in the oven (or simmer on stove top for 45mins over medium low heat).

10. Remove cinnamon quill and strip of lemon peel.

11. Season with salt.

Making couscous
12. Add 200mL boiling water to the couscous into a bowl and place a plate on top and let it stand for 6 minutes.

13. Fluff with fork and add the parsley, mint and preserved lemon.

14. Serve chicken tagine on a bed of couscous.


Notes:

*This tagine can be refrigerated for up to 48 hours or frozen. To serve, bring to room temperature then reheat in a 180C oven for 20-30 minutes until heated through.

*If feeding for 2 people, I use 2 chicken Marylands with skin and halve the vegetables (1 fennel, 1 onion) and 500mL chicken stock.

*Use a tagine baking dish with lid or if you don't have this a cast iron with lid will do.

*You can substitute the cherry tomatoes with any canned tomatoes tin but I love the pops of flavour with the cherry tomatoes.

*I usually add parsley and mint with a little preserved lemon to toss through the couscous.

Saturday, July 4, 2015

Fiery chicken, dakgalbi

This dish, dakgalbi, has always been something I wanted to make but my recent memories of this dish is a sweet potato, cabbage stew that my mother makes. This chicken dish is marinated then cooked with plenty of vegetables and was once a favourite of mine.

It was time to face my fears and see if it was a good dish to keep in my cooking repertoire. Traditionally the dish is made with sweet potato but I replaced this with white radish as it soaks up the delicious sauce. As I didn't have any cabbage in the fridge, I opted with moon buk, a dwarfed variety of buk choy instead. I can happily say that this is one fiery dish that tastes even better the next day. With the cold winter upon us, this dish will hit the spot.


Ingredients


1kg of chicken wings
1 carrot thinly sliced
1 onion thinly sliced
100g long white radish thinly sliced
2 leaves of cabbage* roughly chopped

Marinade
200mL water
3 tbs Korean chilli paste (gochujung)
2 tbs of rice malt syrup
2 tbs soy sauce
2 tbs crushed garlic
2 tbs cooking wine
1 tbs grated ginger
1 tbs curry powder (optional)**
2 tsp Korean chilli powder
1 tsp sesame oil
1 tsp sesame seed
pinch black pepper

Method 


1. Place all the marinade ingredients together.

2. Place chicken into the marinade mix for 1 hour.

3. Thinly slice carrots, onions, radish and cabbage

4. Place the marinated chicken mix into a heavy cast iron pot and bring to boil. Bring to simmer for an hour.

5. With a half hour to go on the cooking, throw in the cut up vegetables.

6. Serve with steamed greens and rice.


Handy hints
*Bunch of moon buk roughly chopped
**I've used a mild korma curry mix or you can make up a curry mix using
1 tsp ground cumin
1 tsp ground coriander
1 tsp dried chilli flakes
1 tsp ground turmeric
1 tsp ground black pepper


Thursday, July 2, 2015

Pork slider with kimchi

The flavours and textures used in Korean food are popping up all over the place, from exciting new restaurants like Moon Park to funky fusion diners like Ms.Gs. With celebrity chefs such as David Chang and Akira Back leading the charge, Korean food is being dabbled with by other hugely successful identities in the dining scene.  As a result, Korean food is developing a real familiarity with Sydney palates. 
I love that Korean food has finally received recognition and has become mainstream to being served in burgers and not just served as a side dish. As my tastebuds have changed over time, I usually detest very fermented kimchi. Only now I've started to appreciate the complexity of the flavours and have finally begun to understand what my parents have been telling me all this time.

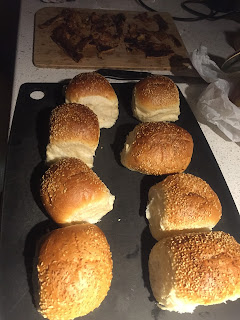
Ever wondered how to make that pork slider, with the tender shredded meat and crackling, then don't venture too far. I found that this dish impressed the friends and family the most, and is so easy to do as the oven does most of the work.

When we served this dish to my brother in law, his response was annoyance that we hadn't served this up to him earlier at our get togethers and loved it so much, it was summed up as, "winner, winner, pork slider dinner".

 
Ingredients

1.5 kg pork belly
1 onion roughly sliced
1 tsp of Chinese Five Spice
1 tsp salt
3 bay leaves
400mL oil (olive oil and rice bran is what I typically use)

To serve
hot sirachi sauce
1/2 cup of mayonnaise
1/2 cup of kimchi
handful of coriander leaves
12 soft white burger buns

Method

 
1. Place pork skin side on a wire rack over the sink.
 

2. Boil a kettle of water and pour over the pork skin.

3. Using absorbent paper, pat the pork dry.

4. Place in a tray and leave in the fridge overnight to air dry. (Steps 2-4 are to help give that crispy crackling but these can be skipped, as I've stated in the handy hints section)

5. Next day preheat the oven to 160C.

6. Rub the pork with salt and 5 spice.

7. Find a tray deep enough to add onion, bay leaves, garlic, oil and pork and cover tightly with foil.

8. Place in the oven and cook for 4 hours or until meat is soft.

9. Drain pork from oil. Remove the meat and return the skin to the grill.

10. Turn the grill on and return the pork belly to crisp up the skin. Make sure you keep an eye on this as you don't want it to burn.

11. Allow the meat to cool before shredding.

12. I also like to refresh the buns to give it a nice crunch on the outside and the contrast of the soft inside. Heat the oven to 180C and leave the buns in for 8mins.

13. To assemble, dollop mayonnaise and chilli sauce on one side of the bun.


14. Add a small amount of kimchi, coriander and a generous heap of pork belly and small pice of crackling. Sandwich and secure in place with a toothpick.

Handy hint
You don't have to wait a day to start this recipe, as soon as you have poured the boiling hot water over the pork and dried this. Add the spices and oil and place into the oven.

If the crackling doesn't work as well, a great trick is to cut off the areas that it didn't work well for and place under the grill and crank the heat up and watch it closely. 


Monday, March 23, 2015

Red Lentil Dahl

My other half, Pepe loves red lentil dhal. Red lentils range from gold to a red in colour and tend to lose their shape and colour when cooked but their thick mushy texture is perfect for Indian dhals. I find this a super healthy dish, especially good to dip your roti canai into.


Ingredients


1 tbs of rice bran oil
1 brown onion, finely chopped
2 garlic cloves finely chopped
1 tbs of mild curry powder (I used korma curry powder-mild)
1 cup dried red lentils rinsed and drained
1 tsp of fresh ginger finely chopped
3 &1/2 cups of chicken stock

1/2 cup of fresh coriander


Method


1. Heat oil in saucepan over medium heat.
2. Cook onion for 8-10 minutes until softened
3. Add garlic, ginger and curry powder and cook for another 2 minutes
4. Add lentil and stock and bring to boil.
5. Reduce heat to low. Simmer partially covered for 30 minutes until lentils have softened.
6. Cook uncovered, stirring occasionally for 20-30 mins until thickened.
7. Remove from heat.
8. Serve warm with coriander and plain roti canai.

Sunday, March 22, 2015

Roti canai and murtabak

I must have been living under a rock when it comes to discovering the dish, murtabak. I remember my first experience at Rumah Indo Restaurant and thinking to myself that this was one tasty dish that I need to learn to replicate.

It's been a weekend of relaxing, picking up 2 Japanese maple trees to add to our garden and trialling a new recipe or two. I was going to attempt to make roti canai and from there I was going to make the filling for the murtabak.

Roti canai is a flatbread that is served with curry throughout southeast Asia. Whereas murtabak is a stuffed pancake made with roti canai and comes in many variations either sweet or savoury.

There are many different recipes available and I did have to look up a few youtube videos to get the hang of flipping the dough. Pepe and I were having competitions to see who could flip the dough better. Quoting the words of my Mr4 year old, "I think, Mummy win".

Start the roti canai the night before, so it will be perfect for breakfast.

Makes 8 serves

Roti canai


Ingredients


450g plain flour
3 tbs ghee

Wet ingredients
1 egg lightly beaten
1 tsp caster sugar
1 tsp salt
250mL water

Method


1. Combine the egg, sugar, salt and water into a bowl, stirring to combine.

2. Place flour into a stand mixer with a dough attachment and pour the wet ingredients in. This mixture will form into dough.

3. Let the dough be kneaded for 5 minutes until smooth and elastic.

4. Grease the work surface with a 2 tsp of ghee.

5. Roll the dough into a sausage and divide into 8 equal pieces.

6. Shape the dough into a ball, rubbing with ghee as you go.

7. Place the balls on tray lined with baking paper and cover with plastic wrap. (Make sure it's wrapped well.)

8. Set aside in a warm place to prove overnight.


Murtabak


Ingredients


1 tbs coconut oil
2 brown onions finely chopped
3 garlic cloves finely chopped
1 tbs of finely chopped ginger
1 & 1/2 tbs of mild curry powder (I used my curry korma powder for this)
500g lamb mince

1 tsp caster sugar
1 tsp of salt
1 egg

150mL ghee

Method


9. Heat 1 tbs of coconut oil in a wok over medium heat.

10. Add the onions, garlic and ginger and curry powder for 8 minutes until onions softened.

11. Add the lamb, sugar and salt. Breaking up the lamb as it cooks until the liquid has evaporated and the meat has browned (approximately 12 minutes).

12. Season to taste and remove from heat and stir in the egg.

13. Place a ball on the work surface brushed with a 1 tsp of ghee. With your hands flatten the dough to square shape.

14. Picking up one corner of the dough with one hand under the dough and other hand over, fling it over your shoulder then back onto the work surface. Move your hands to the next corner, flick the dough again for another two times. Until you have managed to flick the dough for each corner, a total of 4 times as a minimum. Or you can roll out the dough to a thin 30cm square.

15. Place the lamb mix into the centre of the stretched out dough. Brush ghee around the stretched dough with your hands. Fold in thirds. Fold the left hand side into the centre, then fold the right hand side into the centre. Fold in the ends to create a rough 12cm square parcel.

16. Heat 1 tbs of ghee into a fry pan over medium heat.

17. Place the parcel, folded side up first for 5-7 minutes, turning halfway to cook the other side for another 5-7 minutes until golden and cooked through.

18. Repeat with remaining roti canai dough and follow the steps through from 13.

19. Serve with pickled onions and coriander and a side of red lentil dahl.


Handy hints


You can also make sweet roti canai. Instead of the murtabak filling, spread a thin layer of jam, fold up into a square parcel and cook with 1 tbs of ghee. A dusting of icing sugar to serve was a hit with the kids.

Don't over handle the dough, once the dough has been flung, don't attempt to re-roll into ball as it will have lost its elasticity. Pepe learnt this lesson.

When you shape the dough, make the edges thinner before you fling it, as this ensures you don't have to deal with thick edges later.

If you get holes in the edges of your roti canai dough, just fold over a little dough to cover it and either fling it again or stretch it out.

Curry korma powder is available at Harris Farm or at supermarkets in the spice section.

Check out my pickled onion recipe in the next post. I'll also post a the red lentil recipe as well.

Friday, February 6, 2015

Goat and potato vindaloo

Vindaloo. My first few experiences have been extreme with my chilli tolerance tested to the limits. A curry so fierce that I felt as though my eyeballs were about to blow out. My lips would blister from the slightest taste of the sauce which meant smearing them as quickly with yoghurt to cool them down. However as much as I love chilli, I have had to tone it down as I just can't handle it as well as I used to.

The word 'vindaloo' melds the Portuguese word for wine, vinho - and alhos for garlic. Both ingredients figure prominent in original Portuguese recipes and modern Indian adaptations of the dish. The meat originally prepared by this method was pork. Back in the day, the Portuguese would preserve pork in large barrels of vinegar and garlic to stop them spoiling on long sea voyages. The Goan influence is event with the addition of potent fiery chillies and various spices such as ginger, coriander and cumin.

This goat and potato curry is great to make as a big batch as you know with curries, they just get better each day. This is an adaptation of Yotam Ottolenghi's "Two potato vindaloo" as I added goat into the mix.

You'll need at least 2 hours for the goat to cook in the oven and the smells will let you know that dinner is ready.


Ingredients

Spice mix
8 cardarmon pods
1 tbs cumin seeds
1 tbs coriander seeds
1/2 tsp cloves
1/4 ground turmeric
1 tsp ground cinnamon
1 tsp sweet paprika


2 tbs olive oil
12 shallots (300g in total) chopped
1/2 tsp brown mustard seeds
1/2 tsp fenugreek seeds

2 tbs finely chopped ginger
1 fresh red chilli
3 ripe tomatoes peeled and roughly chopped
50mL cider vinegar
400mL water
1tbsp caster sugar

1/2 cup of plain flour
1kg baby goat meat cut into 3cm dice with bone

400g peeled waxy potatoes cut into 2.5cm dice(I used kresta potatoes and kept the skin on)
1 red capsicum cut into 2 cm dice
salt

To serve
mint or coriander leaves


Method

1. Preheat the oven to 180 degrees Celsius.

2. Start with the spice mix. Dry roast cardamom pods and cumin, coriander seeds in a small frying pan until they begin to pop. (You'll hear it, don't you worry)

3. Transfer roasted spiced to mortar and pestle and add the cloves

4. Work to a fine powder before removing and discarding cardamom pods once the seeds are released.

5. Add turmeric, paprika and cinnamon and set aside.

6. Heat oil in a large heavy based pot with lid.

7. Add shallots with mustard and fenugreek seeds and sauté on med-low heat for 8 minutes or until shallots brown.


8. Stir in the spice mix, ginger, chilli and cook for a further 3 minutes.

9. Next add the tomatoes, vinegar, water, sugar and salt.

10. Bring to boil and leave to simmer, covered for 10 minutes.

11. Whilst sauce is simmering, coat the goat in flour (best to put this in a plastic bag and shake it all about).

12. Add olive oil to a fry pan and place on high heat (this will allow the meat to sear quickly as it hits the pan).

13. Cook all the pieces of meat until nicely browned as this intensifies the flavour.

14. Add the potatoes, red capsicum and goat into the large heavy based pot.

15. Make sure all the vegetables are just immersed in the sauce, add more water if needed.

16. Cover with the lid and place into the oven, continue cooking for 2 hours or until meat is tender.

17. Serve hot with plain rice and garnished with mint or coriander leaves.

Handy Hints

You can replace the rice with cous cous.
Freeze the leftovers to enjoy for midweek meal.


Saturday, January 31, 2015

Chicken with Ponzu dressing

I was feeling like I needed to make something Japanese probably due to the fact my other half is in Nozawa Onsen, Japan. The lucky duck is enjoying a skiing trip with the lads but not to worry I'm planning a shopping and eating trip to even the score.

With chicken thighs in the fridge, I thought this would be a quick and easy meal to make. Plus there's the added bonus that the kids love it too. The ponzu dressing is so easy and I love the citrus notes especially as limes are in season at the moment.


Serves 4

Ingredients

4-5 chicken thigh fillets (it's up to you whether you select with skin or without, I like it as either version)
salt
pepper
2 tbs of olive oil (or whatever cooking oil you have)

Ponzu dressing
Juice of 1 lime
Juice of 1/2 lemon
100mL mirin
60mL light soy sauce

To serve
Finely sliced spring onions
Finely sliced red chilli
Rice

Method

1. Make the ponzu dressing first, add the lime, lemon juice, mirin, soy and stir well.
2. Season chicken thighs well with salt and freshly ground black pepper.
3. Heat the oil in a frying pan over high heat.
4. Add chicken (if you use with skin, then skin side first) and cook for 3-4 minutes (or until skin is golden and crispy).
5. Turn chicken over, and cook for another 3-5 minutes until chicken is cooked through.
6. Slice the chicken and arrange on serving plate.
7. Drizzle ponzu dressing, sprinkle the sliced chicken with spring onion and chilli.
8. Serve with rice.

Handy hints

If you like crispy skin then I recommend that you put a smaller pan on top of the chicken to weigh it down which will help with that.


Sunday, January 25, 2015

Really hot spicy jerk chicken


Having dined at The Butler, Potts Point recently, I tried their jerk tofu but it just didn’t quite have the spice hit I needed. I remember making this jerk chicken dish and loving it so much that I knew that I had to keep this in my repertoire.
Cranking the oven up, the skin on the chicken crisps up and is encrusted with the spiced chilli marinade which is countered by the vinegar, lime, rum and spiced marinade making the meat so tender. It's so good.
If you love spice then this dish is for you, as its hot. Pepe, my other half has a couple of bites before the sweat beads make an appearance. This dish packs a punch but the sweet, creamy coconut rice that is served up with it is a match made in heaven. Or a dollop of yoghurt may curtail the heat and be a soothing salve for the mouth.

Check out my review of The Butler.

Ingredients

5 chicken thigh with skin and bone
Dry Spice mix
2 teaspoons ground allspice
2 teaspoons dried thyme
2 teaspoons cayenne pepper
2 teaspoons ground ginger
2 teaspoons ground nutmeg
2 teaspoons ground cinnamon

Ingredients to throw into the food processor
5 cloves garlic
100g ginger, peeled and cut into chunks
1 tablespoons brown sugar
1/4 cup rum
Juice from 2 limes
1/4 cup soy sauce
1/2 cup apple cider vinegar
5 fresh red chillies, whole (I like it hot hence I use a lot of chillies)
1 onion cut in half

Coconut rice
2 cups of jasmine rice
400mL coconut milk
2 large pinches of salt
 

Method

1.       Preheat oven to 200 degree Celcius
2.       Place all the dry spice mix into a bowl
3.       Put all the other ingredients in the processor and blitz
4.       Place the dry spice mix into the processor and mix until it looks a dark earthy paste
5.       Pour and spread the marinade mix over the chicken and leave in the fridge for minimum 2 hours or covered overnight.
6.       Place the chicken and all the marinade into a shallow roasting pan and roast for 40minutes. You should get a chicken that’s cooked through and tender with a thick fiery crust.
7.       Place the rice into a rice cooker with the coconut milk and add 2 large pinches of salt. Check the rice is cooked through once the liquid is all absorbed. If not, give the rice another 5-10 minutes if it’s needed.
8.       Serve up by piling up the dinner plate with coconut rice with the hot crusted chicken on top.
 

Handy tips

*Jerk marinade can be made a day ahead. The chicken can also be marinated up to 24 hours in advance. I like using chicken thighs but feel free to use chicken breast.
*Mix up the leftover coconut rice and shred the chicken with a fresh salad of cucumber, tomato and parsley dressed with olive oil and lemon juice.


Friday, January 9, 2015

Eggplant with yoghurt sauce


Eggplants have always been a favourite vegetable of mine. Even more so, after you make this dish. Trust me after the first bite you'll be in food heaven.

I've been cooking my way through Yotam Ottolenghi's book, 'Plenty' that I bought for my other half, Pepe. I have enjoyed it so much so, that it has been a vegetarian dinnerfest for the past week in my household and so far no cravings for meat. Pepe has had no complaints probably due to this the result of losing weight to fit into his ski pants for a skiing trip with the lads later this month.

This recipe has been adapted from Ottolenghi's cookbook as I was missing a couple of ingredients but I found that that didn't seem to matter with the end result. You'll have to try the eggplant with yoghurt sauce for yourselves.


Serves 2 as a starter or main

Ingredients

1 large eggplant
80mL olive oil
6 sprigs of lemon thyme leaves
1 pomegranate
salt and black pepper

Sauce

100g Greek yoghurt
1.5 tablespoons of olive oil
1 garlic clove
pinch of salt

Method

1. Preheat the oven to 200 degrees Celcius.

2. Cut the eggplants lengthwise. Then use a sharp knife to make 4 parallel incisions in the cut side of the eggplant without cutting through the skin. Repeat on a angle to get diamond shaped patterns.

3. Place eggplants cut side up on a baking paper lined tray.

4. Brush with olive oil until all absorbed.

5. Sprinkle lemon thyme and salt and pepper.


6. Roast in the oven for 35-40mins until nicely browned.

7. Then remove from oven to cool down completely (or else you'll a melted yoghurt sauce) and hang onto the roasted lemon thyme.

8. Whilst eggplants are in the oven, prepare the pomegranate and sauce. Cut pomegranate into two, hold cut side half in your palm and tap the back with a wooden spoon til the seeds starting spilling out through your fingers. Pick out white skin and membrane.


9. For the sauce, whisk all the ingredients together, taste for seasoning and keep cold til needed.

10. To serve spoon the yoghurt sauce over the eggplant sprinkle the roasted lemon thyme and garnish with lots of pomegranate seeds. Finish off with a drizzle olive oil.