Showing posts with label Korean. Show all posts

Friday, February 12, 2016

Happy New Year 2016 mochi ricecakes

The soft chewy texture filled with red bean filling oozing with that first bite, that's when I fell in love with mochi. I vividly remember as an after school snack, mum would purchase these favourite treats of mine. Wrapped in clear plastic, 6 mochi balls of pink, white and green filled with red bean which I would devour in a few minutes.

To celebrate Chinese New Year 2016, I thought I would attempt to make rice cakes of some sort. This meant experimenting with different flours to attempt hoddeok, a sweet Korean pancake which reminded me of the street stalls in Korea selling these tasty treats filled with cinnamon peanut sugary goodness. With that down pat, my next experiment was to try mochi.

Scouring the internet for an easy recipe, they varied from baking the glutinous mix to some fiddly and time consuming methods. I adapted Maagchi's "Korean style mochi rice cakes" recipe for my purposes. I found that you'll need to work quickly with the mochi to make the most of the elastic quality whilst its warm to cover the balls of red bean or black sesame paste. The kids will love stretching out the mochi and attempting to enclose their filling of choice.

The Koreans call this dish chapssaltteok whereas the word mochi is a Japanese word that simply means “rice cake.” The Korean version of chapssaltteok uses the colour green which is created with green tea powder. I found that mochi came in three different colours, white (plain), pink (with 2 drops of red food colouring), and green (with 1 teaspoon green tea powder or 2 drops of green food colouring).

I would of liked to make the filling but due to time constraints, I opted to try the ready made pastes. Next task for me is attempt to make the white sesame filling that hubby loves so much.

You'll never buy mochi again once you discover how easy it is to make it. I recommend you devour a few before the kids and hubby have discovered that you have made these delicious delights.


Makes 10 mochi balls

Ingredients


Filling
Red bean paste
Black sesame paste

Ricecake
1 cup glutinous rice flour
sprinkling of potato starch/ or mung bean starch powder
1 tablespoon caster sugar
1/4 teaspoon salt
3/4 cup of water
2 drops of food colouring of your choice, I opted for green

Outside coating
1/4 cup dessicated coconut
1/4 cup black sesame powder

Method


1. Roll your paste into 10 balls 2-2.5cm diameter for easy insertion into the rice cakes. I found putting the paste in the fridge to harden slightly made it easier to roll into balls. Or sprinkle a little starch powder to prevent the paste sticking to your hands when you roll into balls. Set aside to use later on.


2. Place glutinous rice flour, salt, sugar and two drops of green food colouring into a microwave-safe bowl.

3. Add water to the rice flour and mix well. (It may look like a liquid mix rather than dough, but don't worry)


4. Cover the rice mix with plastic wrap and cook on HIGH 3 mins in the microwave. (Watch the mixture slowly rise and fall before you have a ricecake)


5. Remove the rice cake from the microwave. (Be careful taking off the plastic wrap or else be blasted with hot steam, this happened to me). Mix the rice cake with a spoon for 20 seconds.

6. Cover the rice cake with plastic wrap and put back in the microwave for HIGH 1min.

7.  Knead the hot rice cake with a spoon as the best you can for about 1-2 minutes. This is the key part to get that soft chewy texture.


8. Sprinkle your choice of starch powder on your cutting board. Pull out the rice cake with a spoon into a sausage shape.

9. Wet your hands first, to stop the rice cake sticking to your hands. This way you can attempt to shape your rice cake into a rectangle about 15 cm x 5 cm. (Somehow I managed to flattened my rice cake into an oval shape that was 15cm long and 2-5cm in width) 

10. Cut the rectangle into half with a sharp wet knife and cut 5 even perpendicular cuts, to make 10 pieces of rice cake. Cover the rice cakes with plastic wrap to keep them from getting dried out.


11. Take one piece of rice cake, flatten and stretch out to a round circle about 5 cm in diameter.

12. Add a sweet red bean ball or black sesame ball to the middle of the piece of rice cake. Pull the rice cake over the ball and seal by dabbing a little water to join the edges with your fingers. Roll the mochi to look like a nice round ball. (If the rice cake starts sticking to your fingers, add a little starch powder to prevent this.)


13. I wanted to add an extra dimension of taste, so I dabbed water on the outside of my mochi and rolled this in coconut which the kids loved. Hubby is more of a black sesame fan, so I rolled a few mochi in black sesame powder for him.


14. Repeat this until you’ve made 10 pieces of chapssaltteok/mochi ricecakes.

15. Eat a couple before the kids discover them.

Handy hints
*Red bean and black sesame paste can be found at Asian grocery stores.
*Place paste in the fridge as this hardens this slightly and makes it easier to roll into balls
*Potato starch and mung bean starch can be used. I prefer the mung bean taste so I went with mung bean starch.
*It's extremely hot when it comes out of the microwave, so be careful with removing the plastic wrap.
*Work within 5-8 minutes of the dough being cut to make nice smooth round balls for presentation


Saturday, July 4, 2015

Fiery chicken, dakgalbi

This dish, dakgalbi, has always been something I wanted to make but my recent memories of this dish is a sweet potato, cabbage stew that my mother makes. This chicken dish is marinated then cooked with plenty of vegetables and was once a favourite of mine.

It was time to face my fears and see if it was a good dish to keep in my cooking repertoire. Traditionally the dish is made with sweet potato but I replaced this with white radish as it soaks up the delicious sauce. As I didn't have any cabbage in the fridge, I opted with moon buk, a dwarfed variety of buk choy instead. I can happily say that this is one fiery dish that tastes even better the next day. With the cold winter upon us, this dish will hit the spot.


Ingredients


1kg of chicken wings
1 carrot thinly sliced
1 onion thinly sliced
100g long white radish thinly sliced
2 leaves of cabbage* roughly chopped

Marinade
200mL water
3 tbs Korean chilli paste (gochujung)
2 tbs of rice malt syrup
2 tbs soy sauce
2 tbs crushed garlic
2 tbs cooking wine
1 tbs grated ginger
1 tbs curry powder (optional)**
2 tsp Korean chilli powder
1 tsp sesame oil
1 tsp sesame seed
pinch black pepper

Method 


1. Place all the marinade ingredients together.

2. Place chicken into the marinade mix for 1 hour.

3. Thinly slice carrots, onions, radish and cabbage

4. Place the marinated chicken mix into a heavy cast iron pot and bring to boil. Bring to simmer for an hour.

5. With a half hour to go on the cooking, throw in the cut up vegetables.

6. Serve with steamed greens and rice.


Handy hints
*Bunch of moon buk roughly chopped
**I've used a mild korma curry mix or you can make up a curry mix using
1 tsp ground cumin
1 tsp ground coriander
1 tsp dried chilli flakes
1 tsp ground turmeric
1 tsp ground black pepper


Thursday, July 2, 2015

Pork slider with kimchi

The flavours and textures used in Korean food are popping up all over the place, from exciting new restaurants like Moon Park to funky fusion diners like Ms.Gs. With celebrity chefs such as David Chang and Akira Back leading the charge, Korean food is being dabbled with by other hugely successful identities in the dining scene.  As a result, Korean food is developing a real familiarity with Sydney palates. 
I love that Korean food has finally received recognition and has become mainstream to being served in burgers and not just served as a side dish. As my tastebuds have changed over time, I usually detest very fermented kimchi. Only now I've started to appreciate the complexity of the flavours and have finally begun to understand what my parents have been telling me all this time.

Ever wondered how to make that pork slider, with the tender shredded meat and crackling, then don't venture too far. I found that this dish impressed the friends and family the most, and is so easy to do as the oven does most of the work.

When we served this dish to my brother in law, his response was annoyance that we hadn't served this up to him earlier at our get togethers and loved it so much, it was summed up as, "winner, winner, pork slider dinner".

 
Ingredients

1.5 kg pork belly
1 onion roughly sliced
1 tsp of Chinese Five Spice
1 tsp salt
3 bay leaves
400mL oil (olive oil and rice bran is what I typically use)

To serve
hot sirachi sauce
1/2 cup of mayonnaise
1/2 cup of kimchi
handful of coriander leaves
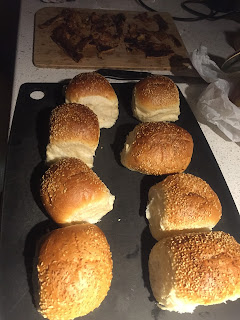
12 soft white burger buns

Method

 
1. Place pork skin side on a wire rack over the sink.
 

2. Boil a kettle of water and pour over the pork skin.

3. Using absorbent paper, pat the pork dry.

4. Place in a tray and leave in the fridge overnight to air dry. (Steps 2-4 are to help give that crispy crackling but these can be skipped, as I've stated in the handy hints section)

5. Next day preheat the oven to 160C.

6. Rub the pork with salt and 5 spice.

7. Find a tray deep enough to add onion, bay leaves, garlic, oil and pork and cover tightly with foil.

8. Place in the oven and cook for 4 hours or until meat is soft.

9. Drain pork from oil. Remove the meat and return the skin to the grill.

10. Turn the grill on and return the pork belly to crisp up the skin. Make sure you keep an eye on this as you don't want it to burn.

11. Allow the meat to cool before shredding.

12. I also like to refresh the buns to give it a nice crunch on the outside and the contrast of the soft inside. Heat the oven to 180C and leave the buns in for 8mins.

13. To assemble, dollop mayonnaise and chilli sauce on one side of the bun.


14. Add a small amount of kimchi, coriander and a generous heap of pork belly and small pice of crackling. Sandwich and secure in place with a toothpick.

Handy hint
You don't have to wait a day to start this recipe, as soon as you have poured the boiling hot water over the pork and dried this. Add the spices and oil and place into the oven.

If the crackling doesn't work as well, a great trick is to cut off the areas that it didn't work well for and place under the grill and crank the heat up and watch it closely. 


Sunday, March 1, 2015

Easiest kimchi recipe ever

I have a rather distinct childhood memory in regards to watching my mother make rather large batches of kimchi. My mother's method began with soaking at least 3-4 cabbages in salt water for 3 days. Next was to wash the cabbage thoroughly with cold water. My involvement required me to pick up and drain the biggest silver tub full of stinky salt water down the sink and then wash it down with the hose. Then getting rubber gloves and mixing in the smelly garlic and chilli powder into the cabbage and ensuring that it was well covered in the pickling marinade.

Perhaps somewhat scarred from this experience and watching my mother pour ad hoc measurements of chilli powder, salt, garlic and chunks of ginger, I rebelled from ever making it and opted to buy kimchi ready made at the Asian supermarket, much to the annoyance of my mother.
It's only since I've had a family of my own and not being entirely happy with the rather sweet kimchi from the supermarket, my interest in making kimchi piqued once again. 
I have experimented with the amounts and timing and the results are a tasty kimchi. I even have the approval of my father who is rather severe critic of Korean food. I found it goes really well with pulled pork rolls instead of coleslaw and Rueben sandwiches instead of sauerkraut. This will make a fresh tasting batch of kimchi which is ready to eat the next day.

My sister is already a fan of this recipe and so it seems that we may have overcome our childhood experiences of making tonnes of kimchi. But I prefer this method as its quick, easy and can be completed in a few hours.


Makes nearly 3 glass containers full

Ingredients


1 whole cabbage
70g cooking salt
Kimchi Marinade
1 onion peeled
20g sugar
50g rice syrup (or use sugar syrup*)
1 thumb sized knob of ginger
120g garlic**
20g fish sauce
1 tablespoon of salt
80g -100g Korean chilli powder (use the coarse grained chilli flakes)
40g garlic chives (not completely necessary but I like it)

Method

1. Cut the cabbage in half, cut the halves again to get quarters and then cut out the core and into 4cm lengths.


2. Place 2 handfuls of cabbage into a large container and sprinkle salt as you go, keep going until you have placed all the cabbage into the container. (Depending on how big the cabbage is, it sometimes fits perfectly into the container and other times it is overflowing but after a couple of hours, the cabbage gets floppy and wilts due to the salt then fits into the container afterwards.)

3. Leave the cabbage to soak in salt for 2-3hrs. (I have once left it for 6hrs as I was too lazy to finish it off but it ended up being fine.)

4. Wash thoroughly with water and leave to drain in colander. 

5. Wash the garlic chives and cut into 1cm lengths.

6. To prepare the marinade, blitz the onion, ginger, garlic with sugar, sugar syrup, fish sauce in a food processor until it resembles a paste.

7. Combine marinade with cabbage, add Korean chilli powder, 1 tablespoon of salt and garlic chives then mix through until a nice red mixture. I tend to look for an overall red colour of kimchi to determine if it has enough chilli powder. (This is when using disposable gloves whilst mixing comes in handy)

8. Place kimchi into airtight containers (I recommend glass jars with clasp lids).

9. Keep in the fridge as it will keep for a 3 months, pending on how you fermented you like your kimchi.
  

Handy Hints

*Sugar syrup is easy to make, I use a 1:1 ratio of sugar and water.
Example you just add 50g sugar and 50mL water into a saucepan onto medium-high heat until sugar has dissolved and bubbles and you have sugar syrup. Or if you want to omit sugar syrup just add an extra 20g of sugar.

**I’ve experimented with amounts of garlic from 60g (too little garlic) and 200g (too garlicky) and I found that 120g is a good balance.

Recommend glass jars as I’ve seen how kimchi can stain plastic containers and the smell remains even with a good scrubbing.

Use the rather old fermented kimchi for pajeon (Korean kimchi pancake).

I use a 6L decor plastc container for one cabbage.