Monday, November 30, 2015

Cherry Tart


Cherries, cherries cherries.

We've always headed to Young, cherry picking capital in NSW for our yearly supply of cherries. With the best time to go being November to December, invite your friends and family to go picking. Indulge in everything cherry, whether its cherry jam, pickled cherries, cherry wine or cherry port. Or pick a few kilograms and wow your friends and family with this delicious cherry tart.

This year, I've written a "How to go about a day trip to go cherry picking in Young" guide for all of those that ask about my cherry picking weekend. (http://www.weekendnotes.com/day-trip-to-cherry-picking-capital-young/)

Make sure you have a couple of drivers for the 4 hour drive and discover Young in a day or two. My hubby thinks I'm crazy as I've driven there and back in a day a few times now. But I totally recommend that you visit Young and taste their plump red cherries and be impressed.


Cherry tart by Bill Granger

Pastry
125g unsalted butter
90g caster sugar
175g plain flour
A pinch of salt
2 tablespoons almond meal

Filling
170mL cream
2 eggs lightly beaten
2 teaspoons vanilla extract
3 tablespoons caster sugar
2 tablespoons plain flour
550g cherries, halved and pitted (fresh is best)

1. Preheat the oven to 180C and grease a 24cm round tart tin.

2. To make the pastry stir together the butter and sugar in a large mixing bowl.

3. Add the flour and salt to stir to make a soft dough.

4. Transfer the dough to the tin and press evenly into the base and side of the tin with your fingertips.

5. Put the tin on a baking tray and bake for 12-15 minutes or until pastry is slightly puffy. Remove from oven and sprinkle the almond meal over the base.

6. To make the filling, whisk together the cream eggs, vanilla and sugar.

7. Add the flour and whist until well mixed.

8. Arrange the cherries, slightly overlapping over the pastry base and pour the cream filling evenly over the cherries.

9. Return the tart to the oven for a further 40-50mins until the filling is firm.

10. Leave to cool and serve with cream or ice cream.
 
This didn't last very long in my household, yummy!

Saturday, November 28, 2015

Cherry Clafoutis

This is a dessert I can never say correctly and hubby just laughs whenever I attempt to say this. Admitting to this fact, please don't ask me how to pronounce it.

I recently made this dessert and I can say its a light and delicious dessert that the kids and I demolished this in minutes.

A little warning though, I kept the cherry stones in as it keeps the shape and flavour of the fruit intact. Please let your guests know before serving. Or you could pit the cherries but I was little time poor to do this.


Ingredients

500g fresh dark cherries
1 tbs caster sugar
2 tbs kirsh (I omitted this due to not having any)

Custard
2 eggs
1/4 cup (55g) caster sugar

1/4 cup (50g) plain flour
1/2 cup (125mL) sour cream or crème fraiche
1/2 cu (125mL) cream
grated rind of 1 lemon

butter for baking
icing sugar for dusting

Method


1. Preheat the oven to 200 degrees Celcius.

2. Place the cherries in a shallow baking dish and sprinkle caster sugar and kirsh, (if using) over them.


3. Bake 5-6mins or until cherries are cooked but still firm. Set the cherries aside and reserve cooking juices.

4. For the custard, beat the eggs with a mixer, then add caster sugar and beat until frothy.

5. Carefully add the flour and combine, then add 1 tablespoon of the reserved cherry cooking juices, sour cream, cream and lemon rind.

6. Dot a small baking dish with a little butter and spread half the custard over the base of the dish.


7. Spoon in the cooked cherries to cover the custard, then add the remaining custard.

8. Bake for 25-30minutes, the top will be golden and the cherries will appear as little mounds in the custard.

9. Serve warm, dusted with icing sugar.


Tips and findings

I have made this a couple of times and even had leftovers cold the next day. Its one of those desserts that does taste good either warm or cold.

Saturday, November 21, 2015

Pickled cherries

As Christmas is only just round the corner, I like to give presents of the homemade kind. This year, I was thinking of gifts of cherries. To herald the plump red cherries coming into season, the first box of cherries for 2015 sold for $65,000 raising money for Save our Sons and the Sydney Markets Foundation.

With cherries on my mind, I wanted to try pickling cherries. Having read that these are great served with pate, duck or pork rillettes, terrines, hams and pickled pork, all of which will probably be part of the Christmas feast this year.

I'm planning to make my mandarin jam basted ham with pickled cherries on the side. Drooling just thinking about this. Following Maggie Beer's recipe for pickled cherries, I can't wait to try these on Christmas Day.


Makes 1kg jar or 5x200mL.

Ingredients

850mL white wine vinegar
700g sugar
24 black peppercorns
12 cloves
6 bay leaves
1 clove of garlic
1kg Morello cherries (I just used fresh dark cherries)

Method

1. Boil all the ingredients except for the cherries in a stainless steel saucepan for 10 minutes, then leave to cool completely.

2. Meanwhile, wash and dry the cherries thoroughly discarding any that are bruised or marked.

3. Trim the stalks to 1cm long. then pack the fruit into a sterilised 1 Litre preserving jar.


4. Pour the cold syrup over the cherries, then seal and store for at least a month. (Maggie uses her after 6 weeks but states that they will keep indefinitely).


Tips and findings

I may used fresh dark cherries instead of Morello and skipped the step in regards to trimming the stalks to 1cm as I wanted to keep intact the stems that were on already on the cherries. As these pickled cherries were going to be given as gifts, I packed the cherries into 7x200mL glass jars. I also added a bay leaf in each jar for a little Christmas green to go with the red cherries.

However after a day or two, the cherries started to float to the surface. In light of this, I waited a couple of days and repacked cherries into 5x200mL sterilised glass jars.

I also had a taste test of 3 day old cherries in the pickling syrup and it has notes of sweet and savoury. I think it will be a hit with the ham, will keep you posted.
I'll leave you on a few interesting facts about cherries. You'll want to make sure you're never low on  cherries again.

Nutritional Facts of Cherries Cherries are a source of potassium, manganese, magnesium, copper iron, phosphorous, vitamin C, vitamin K, thiamine, riboflavin, vitamin B6 and pantothenic acid. They also contain traces of niacin, folate and vitamin A. One hundred grams of cherries is only 63 calories. Cherries are also a good source of dietary fibre, they are low in saturated fat, cholesterol and sodium.

Health Benefits of Cherries
Cherries act as an antioxidant. They can reduce the pain of arthritis, gout, headaches, and can be used for treating bronchitis, asthma and chronic diarrhoea. Cherry juice is helpful for the function of the immune system. Cherries are used for nausea and vomiting, wild cherry bark is an important cough remedy.

Sunday, August 9, 2015

Huon salmon tacos

I've been meaning to replicate an amazing dish "Ocean Trout tacos" that I had tried at Big Stone. I had wondered how they made the taco shell which was so crunchy and delicious combined with the rice and sashimi grade ocean trout was a taste explosion I wanted to have all over again.

Whilst making deep fried dumplings for the kids a few nights ago, I realised the tacos were made from egg wonton wrappers. With this in mind, I was determined to make this dish. Heading down to the Sydney Fish Market, I found that the deboned, skinless Huon salmon was on special and spotting the Huon Salmon caviar on the shelf would add to that extravagance for this dish.

I loved this dish and so did the kidlets. These were so good and being eaten as fast as I could make them. A delicious tasty dish that I will certainly be making again soon.


Makes 24 tacos
 

Ingredients


Rice
1 cup of cooked rice (day old rice works a treat)
1 tsp sesame oil
Pinch of salt

400g deboned and skinless Huon salmon, cut into small cubes
Garnish with spring onion thinly sliced
Tasmanian Huon salmon caviar 50g

Egg wonton wrappers
Canola oil

Sauce
1 tbs rice vinegar
1 tbs light soy sauce
1 tbs mirin 
2 tsp grated ginger


Method


1. Prepare rice by mixing with sesame oil and salt. Roll into long 5cm long logs and set aside.

2. Prepare the salmon, cutting into thin half centimetre slices and then into small cubes. Set aside in a bowl.

3. Make the sauce by combining all the ingredients of vinegar, soy sauce, mirin and grated ginger.

4. Place 2 cups of oil into a wok and place on medium high. (Pointing a wooden chopstick to the base of the heated oil in the wok, when the bubbles rise instantly, you know when it is ready).

5. Place 4 wonton wrappers into the hot oil. As these cooking away, place the tongs in the centre to create a slight depression to give a bowl like appearance. This will be handy when putting the tacos together.

6. Place the cooked wonton wrappers on a plate and add the rolled rice logs.

7. Place a good amount of Huon salmon on top of the rice.

8. Garnish with thinly sliced spring onion and salmon caviar.

9. Sprinkle a teaspoon of sauce on top just before serving.


Handy Hints

What to do with leftover rice?
With the leftover rice, I use sandwich bags and fill this to a handful size to place into the freezer and have rice ready to use at a moment's notice.

Place the unwrapped frozen rice into a bowl in the microwave with a dash of water and place on high heat for 3 minutes to get lovely soft rice instantly.

Ingredients sourced from?
You can find Tasmanian Huon salmon caviar 100g for $15 at De Costi, Sydney Fish Markets.
You can also use Ocean Trout fillets or Huon salmon deboned and skinless.


Thursday, August 6, 2015

Stuffed sardines Catania style

 
This dish is homage to my time spent in Sicily. When I heard of my inlaws' impending trip to Dubai, Malta and Sicily, it didn't take long to convince hubby that we were going to tag along. A week of last minute organising flights and accommodation, it was one of the craziest things I have done.

Whereas we had managed to secure a beautifully decorated hotel, Shalai in town with alfresco murals adorning the ceiling, my inlaws had managed to secure a homestead just outside of Linguglossa. With views to an active Mt Etna spewing smoke into the sky, surrounded with olive trees, fruit orchard with a secret garden feel.

We headed into town for our usual supply of pecorino, assortment of salamis, delicacies and biscuits. Whilst in town, we spied the local fish shop and checked out the fresh catch of the day. The sardines caught my eye, as well as the copious amounts of young and mature pecorino and crusty bread.

Unbeknownst to us, the town had been decorated overnight with flags of pink. With blaring music, the locals out and about, I came across a van selling paraphernalia for the 2011 Giro d'italia. 

My lightbulb moment.

Click! It's the cycling race which is the precursor to the Tour de France. How exciting to be here whilst it was all happening.

With growing excitement in the air, we were told the race would be passing straight past the house. I was surprised at the number of support crew but understanding mishaps happen in minutes, it's best to be prepared. Watching numerous skodas driving past, motorbikes weaving in and out of steady queue of support and media cars, policemen on stanby posted along the route.


Not knowing when the race was happening, we were pacing from the back to the front of the house. The growing crescendo of beeping horns signalled that the peloton was on approach.

These lean athletes were within eyeshot, climbing the long ascent to where we were standing before whizzing past in the blink of an eye. There may have been a few stragglers which we cheered on with gusto.

It may be the closest I was going to get to Alberto Contador, who also won the race a few days later. Standing beside my inlaws, I must have looked like a loony waving a rainbow coloured sun umbrella in my bright pink Gira d'Italia tshirt cheering as the cyclist flew past. Hubby lugged our 6 month bub who looked rather bewildered at the whole experience.
 
It was soon back to lunch, setting up the front porch with pillows and blankets for bubba to explore.

The boys, ahem men, made fire to bbq our sardines. Lunch was a success with a glass of the Mt Etna white in hand. One of the many amazing memories on this trip.

Counting down the days til the next trip which is in a few more sleeps time.


Serves 4
 

Ingredients 


800g sardines, filleted and cleaned
100g bread with crusts removed
100g aged pecorino cheese, grated 
Italian parsley
Plain flour
Sunflower oil
Red wine vinegar
 

Method 


1. Bone the sardines and soak in vinegar for 20mins. Dry and lay flat. 

2. Soak the bread in the vinegar. Wring out, mix with cheese and chopped parsley. 

3. Spread a little of the stuffing on the flesh side of half the sardines. 


4. Lie another sardine on the top, forming a kind of sandwich and seal thoroughly. 

5. Flour and fry in oil.


Handy hints

I have found filleted sardines at the Sydney Fish Market at De Costi for about $10 which removes the fiddly work of having to do it yourself.
 

Saturday, July 25, 2015

My fave lemon tart

This recipe is made with homegrown lemons which are their best during the winter. As I'm getting over a cold, I wasn't going to say no to a bagful of bright yellow lemons. What better treat is a lemon tart for an afternoon tea or served as dessert after dinner on these cool evenings.

Your guests will be in for a treat with this one. I've had a few requests for this one, so I've finally written it down. A creamy tart filling with the perfect pastry crust. Totally divine, if I say so myself. This delectable tart was gobbled down quite quickly before you could say, 'Can I have some more, please?'


Ingredients


Sweet pastry
300g cups plain flour
150g unsalted butter cubed
120g icing sugar
pinch of salt
1/2 tsp vanilla extract
3 egg yolks
Zest of 1 lemon

Filling
3/4 cup caster sugar
zest of 1 lemon 
3/4 cup lemon juice
1/2 cup double cream
1 tsp vanilla extract
6 eggs


Serves 8
 

Method


1. In a food processor, combine flour, butter, salt, icing sugar until it forms a coarse crumb like appearance.
 
2. Add egg yolks and vanilla extract into the food processor and mix until combined.
 
3. Shape pastry into a disc and cover with plastic film and place in the fridge for 30 mins.
 
4.  Make a cartouche* with baking paper to cover the base of the 20cm flan pan or 20cm springform cake pan. Basically a circular shaped piece of baking paper so the tart crust doesn't get stuck on the bottom.

5. Roll out pastry between baking paper and the plastic film used to wrap pastry.

6. Place pastry into a lined 20cm flan/cake pan. Use your hands to mould pastry around the flan/cake pan. Cut off excess pastry around the flan/cake pan with a knife.
 
7. Prick the pastry lightly with a fork and refrigerate for 30mins. (This is so the pastry doesn't shrink and to add as much of that delicious filling as you can)
 
8. Preheat the oven to 180C degrees and bake the pastry case with baking paper held down by dried beans for 15-20 mins.
 
9. Remove baking beans and return pastry case to bake for another 10 mins. Before taking out to cool.
 
10. Turn the heat down to 150C. 

11. Whisk together sugar, zest, lemon juice, cream, vanilla extract and eggs one by one. 

12. Pour the lemon filling into the pastry case and cook 35-45 mins or until the mixture is set.

13. Serve as is or with a dollop of icecream.


Handy hints
 
*How to make a cartouche.
I usually start with a square, fold in half to get a rectangle, fold in half again to get a square, then fold again along the edge of the folds to get a triangle. You will want to use the end with no edges or else you'll end up with 2 semi circles. Place pointy end to the centre of the 20cm cake pan and cut off the larger end of the triangle to fit within the cake pan. When you unfold the baking paper, it should be a perfect circle.


Thursday, July 23, 2015

Light and fluffy superhero pancakes

What is it about the golden brown, crisp on the edges, light and fluffy centre, that has you coming back for more? That's right, I'm talking about the all time favourite, pancakes.

This pancake recipe is extra light and fluffy with a balance of just the right amount of baking powder and baking soda giving the pancakes light texture and golden brown colour.
 
It's also not too bad in making fun characters for the kids too. My sister set me a rather large challenge to cook pancakes like a boss with superheroes such as all the characters from Avengers.

I took the challenge on and asked the kids what they wanted, this varied from Pokémon, George Pig and Baymax so I did all three, of course.


So what do you think of my creations?


Makes about 20 pancakes or 10 the kids' fave characters

Ingredients


Dry Ingredients
2 cups plain flour
1 teaspoon baking powder
1/2 teaspoon baking soda
1 teaspoon salt
1 tablespoon sugar


Wet ingredients
2 large eggs, separated
1 1/2 cups buttermilk*
1 cup of unsweetened yoghurt (I use Greek Yoghurt)
4 tablespoons coconut oil (or if you want to be more decadent use butter), plus more for serving


To serve
Maple syrup


Method

1. Combine flour, baking powder, baking soda, salt, and sugar in a large bowl and whisk until mixed through.

2. In a medium bowl, mix the egg yolks, buttermilk, and yoghurt until mixed through. Slowly drizzle in the melted butter/coconut oil while whisking

3. Carefully fold in the egg whites with a rubber spatula until just combined. Pour the mixture over the dry mix and fold until just combined (there should still be plenty of lumps).

4. Using a stand mixer, whisk the egg whites until stiff peaks form.

5. Heat a large heavy-bottomed non-stick frypan over medium heat for 5 minutes

6. Add a small amount of butter or oil to the frypan.

7. Use a 1⁄4 measuring cup to place 4 pancakes in the pan and cook until bubbles start to appear on top and the bottoms are golden brown, This will take about 2 minutes.

8.  Carefully flip the pancakes and cook on the other side until golden brown. This will take about 2 minutes too.

9. Serve the pancakes immediately, or keep warm on a wire rack set in a warm oven while you cook the remaining batches.

10. Serve with maple syrup and butter.


Handy hints

* You can easily make buttermilk using milk and vinegar.
1. Place a Tablespoon of white vinegar or lemon juice in a liquid measuring cup.
2. Add enough milk to bring the liquid up to the one-cup line.
3. Let stand for five minute. Then, use as much as your recipe calls for.

How to draw characters
If you are going to make characters, my tips are to keep the frypan hot to ensure the outline is noticeable. Work reasonably fast as it's hot work.

Place the batter mix into a squeezie bottle (say an empty tomato sauce).
Draw the outline of your choice of character, freehand of course.
Add details such as the eyes, ears, hands, feet first and leave for a 1 minute.
Fill in the spaces with the remaining batter and wait for the bubbles to come up before turning over.


Wednesday, July 22, 2015

Cocoa Coconut Roughies


Needing a super fast easy treat to appease the kids? A treat that's sugar, gluten and diary free, nutritious and satisfies a sweet tooth craving. These Cacao Coconut Roughies are so good, you'll need to make double quantities to keep up with the demand as the kids will love them.


Preparation Time: 3 minutes
Cooking Time: 10 minutes
Makes: 15-20 rectangles

Ingredients

100g almond meal (or hazelnut meal for a nuttier taste)
80g rice malt syrup
50g dessicated coconut
100g coconut oil
20g linseed
20g cacao powder
pinch of sea salt
20g rice bubbles for an extra crunch (can leave out if you want)


Method


1. Combine the almond meal, rice malt syrup, coconut, coconut oil, linseed, and rice bubbles if you are using these.

2. Press mixture into a small lined tray and press into the mix with your hands and place in the fridge or freezer to set for 5-10 minutes.

3.  Once this mix has set, remove from the tray and cut into little rectangles. It is best served chilled or else they will melt on a warm day.To store keep these in a container in the fridge or freezer for a longer shelf life. But I doubt that they're last that long.

Handy tips
If you need it to be sweeter, throw in  a few chocolate drops and that will hit the spot.


Tuesday, July 21, 2015

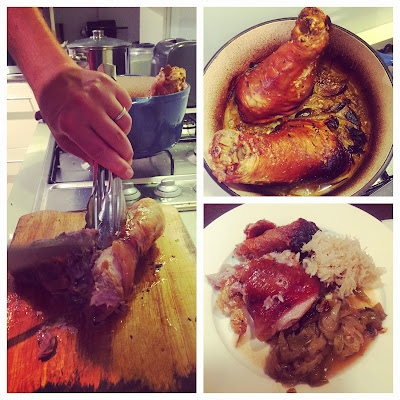
Roast pork knuckle

 
I remember watching an episode of the German Food Safari and it was after watching the Roast Pork Knuckle Recipe, I decided then and there, that we were going to have this dish for Christmas Eve. It is one decadent dish and probably best eaten once a year.
 
Whether it is Christmas or settling into hibernation for the winter, this dish is truly one to try. It's easy to make and the crunch of the crackling and taste of caraway and melting pork meat, is what its all about.


Ingredients


1 apple roughly chopped (red or green is fine)
1 brown onion thinly sliced
2 pork hocks
6 cloves of garlic finely chopped
2 tbs of salt
1 tbs of caraway seeds
2 cups of water


Method


1.Preheat oven to 180C.

2. Smear hocks with salt to get a good crunchy crackling

3. Smear hocks with garlic and caraway seeds

4. Cover the base of the cast iron with the chopped onions and apple before adding the pork hocks on top.

5. Add 2 cups of water or til half full

6. Place into cast oven into the oven to cook for 2.5 hours. (No need to cover with lid)

7. The meat will fall off the bone and smell amazing.

8. Serve up pork knuckle with sauerkraut and glass of cider or beer.


Handy hints

Use a cast iron pot or a deep pot as it gives the pork hocks something to lean against rather than an open oven roasting dish. I found that my pork hocks were always falling over into the onion apple mix which meant the crackling didn't work as well.


Saturday, July 18, 2015

Mulled wine perfect for Christmas in July

I love a good mulled wine and it's a must when celebrating 'Christmas in July' or any cold winter's night. A nice warming drink that was a hit on the night. So much so that I've had to write it down to swap recipes with another friend.


Ingredients

2 oranges (peel and juice)
1 lemon (peel only)
3 bay leaves
2 star anise
1 whole nutmeg
1 cassia bark (cinnamon stick will work too)
200 g caster sugar
2 bottles of Shiraz (I used Syrah/Shiraz grapes from Spain)


Method

 
1. Using a peeler, peel large sections of peel from the 2 oranges and 1 lemon.
 
2. Place the sugar in a large saucepan over a medium heat with the juice of 2 oranges.
 
3. Throw in enough red wine to cover the sugar.
 
4. Let this simmer until the sugar has completely dissolved into the red wine and then bring to the boil.
 
5. Add peel, cassia bark, bay leaves, star anise and about 10 to 12 gratings of nutmeg and keep on a boil for about 4 to 5 minutes, or until you've got a beautiful thick syrup.
 
(This will create a wonderful flavour base by getting the sugar and spices to infuse and blend well with the wine. It's important to make a syrup base first as it needs to be quite hot. If you were to do this with 2 bottles of wine, you'll burn off the alcohol.)

6. When your syrup is ready, turn the heat down to low and add the rest of the wine.
 
7. Gently heat the wine and after around 5 minutes, when it's warm and delicious, ladle it into glasses or in my case mugs and serve.


Mandarin jam glazed ham

Having always wanted to try to make glazed ham for Christmas, it was finally my chance. I had visions of marmalade, whisky and mustard flavours studded with cloves.


Researching recipes that had instructions to soak the ham with water, or add cider or guiness in the basting mix, wasn't really what I had in mind.

Pre-ordering my 6kg Kurabuta honey smoked leg ham from the local butcher meant that I didn't have to pick it up til the day before. As I recently re-sorted my spice stocks, I knew what I had in the pantry.


My glaze was going to consist of a jar of my homemade mandarin marmalade, a good dose of brown sugar for caramelisation dosed with ginger and mustard. Fingers crossed, I hoped that the glaze would work out. The baking smells of ham, marmalade and cloves are irresistible. Watching the fat rendering, separating into the diamond shapes highlighting the clove centres, this was going to be one good looking ham.

With time up my sleeve, I covered the bone part of my ham with a white napkin wrapped in a green ribbon and a bouquet garni of freshly picked rosemary and thyme to finish the dish.

Not only did it look good but it tasted amazing. Can't wait to have another go at this at the end of the year.


Based on weight of 6kg, 18-22 serves

Ingredients


250g (1 cup) mandarin marmalade
5 tbs brown sugar
1.5 tbs mustard powder
1 tbs ginger powder
6kg Kurobuta easy carve smoked leg ham (bone is removed for easy carving)
cloves to decorate

Method      


Prep the ham
1. Use a small sharp knife to cut around the rind, about 5cm from the end where the bone is.

2. Run a knife under the rind, around the edge of the ham.

3. Gently lift rind off in one piece by running your fingers between the rind and the fat.

4. Score the fat, (in our case there wasn't that much fat, so it was a 0.5cm deep), in a diamond pattern, taking care not to cut into the meat.


5. Place a single clove at the centre of the diamond pattern (this will also help the fat lifting away from the ham)

6. Preheat oven to 200°C (400°F).
 
7. Place the marmalade, mustard, sugar, ginger in a bowl and whisk to combine.
 
8. Baste the ham every 10 minutes for 35-40mins or until the ham is golden and caramelised.


Handy Hints
Freeze left over ham and ham bone for soups. Label, date and freeze for up to one month. When ready to use thaw in fridge overnight.

Leftover ham is fantastic for breakfast or supper. My sourdough bread was perfect for the job with pickled onions, avocado. 


Guide to ham weights

3kg - 10-14 serves
4kg - 12-16 serves
5kg - 15-20 serves
6kg - 18-22 serves
7kg - 20-25 serves
8kg - 23-27 serves

Saturday, July 11, 2015

Basque burnt cheesecake

Researching our next trip to the Basque region, I came across a recipe for a Basque burnt cheesecake. In readiness for our trip to San Sebastian and the food to eat, I was excited to learn that this is a place where you have to eat dessert first.

Not due to the fact that this is a Basque tradition but if we were to fill ourselves on savoury tapas, all this delicious cheesecake from the cafes will be gone. 

This must be the easiest cheesecake to make and equally delicious. I'll be sure to make a trip to the cafes in San Sebastián to get my fill of this cheesecake. 

And yes dear sister, it's meant to be burnt as the sugars form a delicious crust  which I can't get enough of. Will make it for you soon. 


Ingredients


600g cream cheese
4 eggs
275g caster sugar
300mL thickened cream
1 tbs plain flour 

Method


1. Preheat the oven to 200 degrees Celcius. 

2. Grease and line the bass and sides of a 23cm springform cake pan with baking paper so the paper comes 2cm above the rim of the pan. 

3. Beat the cream cheese using electric beaters until smooth and creamy. 

4. Add the eggs, 1 at a time, beating well after each addition. 

5. Gradually beat in the sugar, then the cream, then add the flour and beat until smooth. 

6. Pour the cheesecake batter into the prepared pan and tap the pan gently on a flat surface to remove any air bubbles. 

7. Bake for 50mins or until the top is dark brown and cake is set with a slight wobble in the centre and a skewer inserted into the centre comes out clean. 

8. Remove from the oven and leave to cool completely before removing from the  pan. 

9. The cake is best eaten within a few hours of baking. (Actually is still really good til the next day). 


Handy hints

The recipe did ask for double cream (fat content of 48%) as it is the most versatile cream because it withstands boiling and whips and freezes well.

But I opted for the thickened cream (fat content of 35%) which does an equally good job for this cheesecake and for whipping into cream.


Saturday, July 4, 2015

Fiery chicken, dakgalbi

This dish, dakgalbi, has always been something I wanted to make but my recent memories of this dish is a sweet potato, cabbage stew that my mother makes. This chicken dish is marinated then cooked with plenty of vegetables and was once a favourite of mine.

It was time to face my fears and see if it was a good dish to keep in my cooking repertoire. Traditionally the dish is made with sweet potato but I replaced this with white radish as it soaks up the delicious sauce. As I didn't have any cabbage in the fridge, I opted with moon buk, a dwarfed variety of buk choy instead. I can happily say that this is one fiery dish that tastes even better the next day. With the cold winter upon us, this dish will hit the spot.


Ingredients


1kg of chicken wings
1 carrot thinly sliced
1 onion thinly sliced
100g long white radish thinly sliced
2 leaves of cabbage* roughly chopped

Marinade
200mL water
3 tbs Korean chilli paste (gochujung)
2 tbs of rice malt syrup
2 tbs soy sauce
2 tbs crushed garlic
2 tbs cooking wine
1 tbs grated ginger
1 tbs curry powder (optional)**
2 tsp Korean chilli powder
1 tsp sesame oil
1 tsp sesame seed
pinch black pepper

Method 


1. Place all the marinade ingredients together.

2. Place chicken into the marinade mix for 1 hour.

3. Thinly slice carrots, onions, radish and cabbage

4. Place the marinated chicken mix into a heavy cast iron pot and bring to boil. Bring to simmer for an hour.

5. With a half hour to go on the cooking, throw in the cut up vegetables.

6. Serve with steamed greens and rice.


Handy hints
*Bunch of moon buk roughly chopped
**I've used a mild korma curry mix or you can make up a curry mix using
1 tsp ground cumin
1 tsp ground coriander
1 tsp dried chilli flakes
1 tsp ground turmeric
1 tsp ground black pepper


Thursday, July 2, 2015

Pork slider with kimchi

The flavours and textures used in Korean food are popping up all over the place, from exciting new restaurants like Moon Park to funky fusion diners like Ms.Gs. With celebrity chefs such as David Chang and Akira Back leading the charge, Korean food is being dabbled with by other hugely successful identities in the dining scene.  As a result, Korean food is developing a real familiarity with Sydney palates. 
I love that Korean food has finally received recognition and has become mainstream to being served in burgers and not just served as a side dish. As my tastebuds have changed over time, I usually detest very fermented kimchi. Only now I've started to appreciate the complexity of the flavours and have finally begun to understand what my parents have been telling me all this time.

Ever wondered how to make that pork slider, with the tender shredded meat and crackling, then don't venture too far. I found that this dish impressed the friends and family the most, and is so easy to do as the oven does most of the work.

When we served this dish to my brother in law, his response was annoyance that we hadn't served this up to him earlier at our get togethers and loved it so much, it was summed up as, "winner, winner, pork slider dinner".

 
Ingredients

1.5 kg pork belly
1 onion roughly sliced
1 tsp of Chinese Five Spice
1 tsp salt
3 bay leaves
400mL oil (olive oil and rice bran is what I typically use)

To serve
hot sirachi sauce
1/2 cup of mayonnaise
1/2 cup of kimchi
handful of coriander leaves
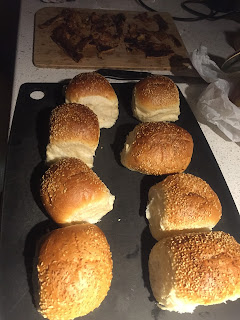
12 soft white burger buns

Method

 
1. Place pork skin side on a wire rack over the sink.
 

2. Boil a kettle of water and pour over the pork skin.

3. Using absorbent paper, pat the pork dry.

4. Place in a tray and leave in the fridge overnight to air dry. (Steps 2-4 are to help give that crispy crackling but these can be skipped, as I've stated in the handy hints section)

5. Next day preheat the oven to 160C.

6. Rub the pork with salt and 5 spice.

7. Find a tray deep enough to add onion, bay leaves, garlic, oil and pork and cover tightly with foil.

8. Place in the oven and cook for 4 hours or until meat is soft.

9. Drain pork from oil. Remove the meat and return the skin to the grill.

10. Turn the grill on and return the pork belly to crisp up the skin. Make sure you keep an eye on this as you don't want it to burn.

11. Allow the meat to cool before shredding.

12. I also like to refresh the buns to give it a nice crunch on the outside and the contrast of the soft inside. Heat the oven to 180C and leave the buns in for 8mins.

13. To assemble, dollop mayonnaise and chilli sauce on one side of the bun.


14. Add a small amount of kimchi, coriander and a generous heap of pork belly and small pice of crackling. Sandwich and secure in place with a toothpick.

Handy hint
You don't have to wait a day to start this recipe, as soon as you have poured the boiling hot water over the pork and dried this. Add the spices and oil and place into the oven.

If the crackling doesn't work as well, a great trick is to cut off the areas that it didn't work well for and place under the grill and crank the heat up and watch it closely. 


Monday, June 22, 2015

Decadent Chocolate Fondants

I haven't forgotten you all and I've been on adventures to Taiwan and Hong Kong which I will need to fill you in at another time but I needed to stop and write a recipe for my decadent chocolate fondants.

I recently ate at Big Stone Tapas in North Sydney and I couldn't get over how amazing the chocolate fondant dessert was. It was one of the things I missed most on my travels was being able to cook and bake for my family.

I decided to rectify this to replicate a quick and easy chocolate fondant that could be whipped up whilst we enjoyed our family dinner of spaghetti bolognese.


Serves 6

Ingredients


100g dark chocolate
100g unsalted butter

2 eggs
2 egg yolks
100g sugar

100g plain flour


Method


1. Preheat the oven to 150 degrees Celcius

2. Use a thin slice of butter and use this to grease the ramekins. (I use a pannacotta mould as I wanted these to be small as these were rather decadent)

3. Add chocolate and butter into a microwave dish with lid and place in the microwave for High 50 seconds. The chocolate wouldn't have completely melted but stir this mixture around and it will melt due to the residue heat from the butter.

4. Add eggs and egg yolks with the sugar into a mixing bowl and whisk for 3 minutes until pale yellow in colour.

5. Add the chocolate mixture to the egg mix and fold in the 100g of flour.

6. Divide the mixture into the ramekins and place on an oven tray.


7. Bake for 8-10 mins or until the surface is cooked but still soft in the centre.

8. I like to serve mine with a dollop of yoghurt as it is a rather rich dessert.

Sunday, June 21, 2015

Spaghetti Bolognese you want to make a big batch of.

I've been looking for a Bolognese sauce to impress hubby and have been playing around with a few things but I will say that I am most impressed with Matt Preston's Simple Bolognese recipe. So much so that I have made this twice already and haven't had the need to change the quantities and now have an easy method to make this. This recipe makes a good amount, as I have 3 containers in the freezer ready for the next spag bol night. Perfect for a cold winter's night and one that hubby and the kids' love.


Matt's simple bolognese

Serves 4-6

Preparation time: 15 minutes

Cooking time: 30 minutes or as long as possible

Ingredients

Olive oil
40g butter

To make soffritto
2 medium carrots, diced small
3 medium brown onions, diced small
4 bacon rashers cut into fingernail size tiles
2 celery sticks, diced small

1 tbsp soft brown sugar
4 cloves garlic, peeled, chopped and crushed
3 tbsp tomato paste

1kg beef mince
1 lemon
500ml red wine
3 bay leaves
Splash Worcestershire sauce
2 cans tinned tomatoes
500ml beef stock

1 large pack of egg tagliatelle  the curly nesty ones are nicest
150g Italian parmesan cheese
1 loaf crusty bread and a green salad for serving

Method


1. Place a large pot on the heat.

2.  Throw the onions, carrots, celery, bacon rashers into the food processor and blitz until diced small.

3. Pour in 2 tablespoons of olive oil and 40g butter into the hot pan. When the butter is melted and the oil hot, throw in the carrots, onion, celery and bacon. Cook until veg is soft and going translucent at the edges (about 10mins).

4. Sprinkle over 1 tbsp of brown sugar and stir through.

5. Add garlic and tomato paste. Move this all round the pan to cook out for three minutes.
Scrape the tomatoey soffritto into a bowl.

6. Splash in some more olive oil.  When it is hot, throw in the mince and cook until browned. Stir the meat the whole time so it cooks evenly. (Depending on the size of your pot, you may find it easier to do this in two batches.)

7. Cut a 4cm long ribbon of lemon peel (without pith) and cut the lemon in half.

8. Scrape meat into the soffritto bowl.

9. Turn up the heat and deglaze using the red wine.

10. When the wine has reduced by half, add back in meat, soffritto, bay leaves, a couple of good dashes of Worcestershire sauce, lemon peel, tomatoes and stock. Stir.

11. Season with salt and a good squeeze of lemon juice from one half of the lemon. Reserve the rest.

12. Bring to the boil covered, then remove lid and turn the heat right down. Cook very gently for up to four hours. Stir occasionally to ensure the sauce doesn't stick and burn. (If the sauce gets too thick, add some more stock and stir it in.)

13. The sauce is ready when it smells irresistible, wonderfully thick, and is a dark red, glossy colour.


14. Taste and season with a little more salt and lemon juice as required. You can now either serve it straight away or cool it and refrigerate before using the next day.

15. Cook the tagliatelle in plenty of salted boiling water in a large pan. When the pasta is cooked but still a little firm to the bite, carefully scoop out a cup of the starchy cooking liquid and drain the pasta.

16. Put a generous ladle of the bolognese sauce in the pasta pot (about two cups) and toss through the pasta. Moisten the combination with a little of the reserved pasta water so it isn't clumpy.

17. Feel free to use as little or as much sauce as you like  we've got lots of plans for the sauce that's left over.

18. Serve it with grated parmesan over the tagliatelle, bread for mopping up the leftover sauce and crisp green salad.